
Showing posts with label kindergarten. Show all posts
Showing posts with label kindergarten. Show all posts
Friday, September 18, 2015
An artist talks with pictures!
I'm an artist and I talk with pictures! This is how I display instructions for my kindergarten and first grade classes. I printed the pictures, had them laminated, and put magnets on the back.

Wednesday, March 18, 2015
Romero Britto in Kindergarten
I love to make Pop Art to go in the hall when spring gets here. It's so bright and lively! They are great pieces that contrast the past few winter months. I wanted to try this Romero Britto inspired art lesson with Kindergarten, but wasn't sure how they would turn out. To say the least, I am pleasantly surprised and will definitely keep this lesson in my repertoire for years to come. Here is my example.

.jpg)
.jpg)


.jpg)
.jpg)
.jpg)
.jpg)
After looking at and discussing Britto's art, the students traced a shape on their paper. I chose to offer a heart, fish, or butterfly. It was close to Valentine's day when we started these, so I got LOTS of hearts. Next they drew three lines going from ones side of the page to the other, and put black oil pastel on the pencil lines.
Time to paint in the open spaces!
Finally, use colored oil pastels for patterns and designs.
Here are some nice ones I wanted to showcase.
Do you do any Pop Art with your kinders? Please share in the comments!
Monday, February 18, 2013
Winter Cardinals
Winter is almost over but I wanted to do a winter project with my kinders. I've always enjoyed the sight of a bright cardinal during the winter months. The contrast of a cardinal and a bare tree is gorgeous, and even more so if it's a snowy day.

I really thought this project would be great for my kindergartners because of the fine motor skill practice of tearing and cutting. They also got to experience controlled splatter paint. I don't care what age you are, splatter paint is fun!


They worked so hard, and a lot of people were surprised when I told them kindergarten made these. This will definitely be a project I do next year.
Wednesday, October 31, 2012
Secondary Pumpkin Patches
Happy Halloween all! Here is an example of the pumpkin patch pictures that I made with kindergarten.

I wanted to review color mixing with my kinders and do something fall related. I thought it would be nice to make pumpkins at night. I gave each table a tray prefilled with two primary colors and gave them a chance to swirl and mix. I love how excited they always get when they make a new color. We mixed and painted the pumpkins first. I took up the orange trays and gave them new trays to mix up green, and then let them mix purple for the night sky. During the next class meeting they drew in lines with black crayon. Then I gave them brown, green and yellow paper to glue in shapes for the stems, leaves, and stars. The paper was pre-painted and came from my scrap bins. They gave a really nice texture to the paintings.


Please take a moment to subscribe, like me on facebook, or follow along on google+
Tuesday, July 17, 2012
Art Camp: Textured Elephant Faces
In addition to the quilts from Gee's bend, there is a Bill Traylor exhibition at The Frist. Bill Traylor was a self taught artist who mainly drew from life. Below is one of his drawings that is exhibited at The Frist right now.

When I saw this picture I knew I had to do one of my favorite elephant projects.


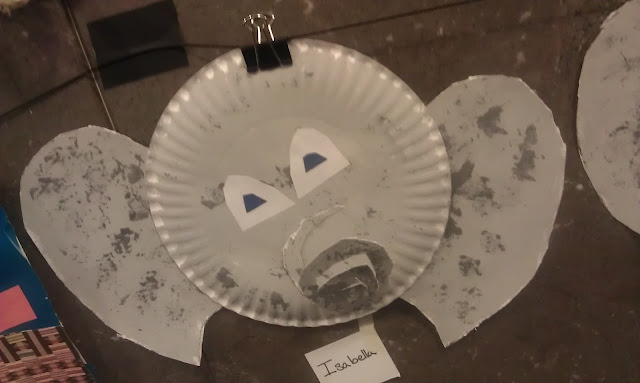


This is a lesson I do with my kindergartners. The lesson works on tracing, cutting, shapes, painting in the lines, texture, new painting techniques, and symmetrical shapes. It's a lot, I know, but the lesson has worked so well.
First we talk about texture. We define it and find examples. I ask my students what the texture of an elephant is. Common responses are dry, rough, and wrinkly. I inform them that we're making an elephant face from a paper plate, paint, and different shapes. I pass out large white paper, a template for ears, and a circle for the nose. I love their faces when I tell them that the trunk will be made from the circle. You can see them trying to process and figure out how. They trace the ears and circle in black crayon and paint all of the pieces a light gray including the plate.
Next, each student gets a pre-cut square of plastic grocery bag. I show them how to "crumple" the plastic, paint dark gray onto it, and add texture to the elephant. Again, all shapes get textured paint. I really like that I'm able to find a reason to reuse the plastic bags.
The next time we meet, they cut out all of their shapes and attach the ears to the back of the plate. I've learned to use glue and masking tape. I've found that glue and tempera don't always seem to work together that well, so the tape adds extra reinforcement. I show them how to cut their circle into a spiral and attach it for the trunk. They love this part and think it's so cool. What's great is that I will see spirals turning up in other art projects without prompt.
Lastly I teach them how they can get the exact same shape from one piece of paper if they fold and then cut out their shape. They do this step for their eyes. What's great about this step is later on I'll see them realize that they can fold the paper more than one time and get more than two shapes. I love seeing the students problem solve!!
Here are some student examples.


I really like the shape of the eyes on the last one!
Friday, July 13, 2012
Art Camp: Gees Bend Inspired Paper Quilts
Tomorrow is the last day of camp at The Frist and I wanted to post some projects we've made over the next few days. The camp that I taught was Art Smarts for ages 5-7. It was a week long half day camp where we explored different art making methods each day: form/sculpture, painting, collage/assemblage, drawing, and printing. In addition, most of the projects are related to the current exhibitions.
Side note: One of my favorite things about The Frist is that they are a visiting gallery. The museum does not have a permanent collection and the exhibitions change about every three months. I love this. There will always be something different and there have been once in a lifetime exhibitions. Exhibitions that have come from other countries that may never leave their home museums again in my life time. Awesome!
One of the exhibitions there at the moment is Creation Story: Gee’s Bend Quilts and the Art of Thornton Dial.


Here is a link to an older article for a different Gee's Bend exhibition, but it still has some interesting information.http://www.npr.org/templates/story/story.php?storyId=970364
Side note: One of my favorite things about The Frist is that they are a visiting gallery. The museum does not have a permanent collection and the exhibitions change about every three months. I love this. There will always be something different and there have been once in a lifetime exhibitions. Exhibitions that have come from other countries that may never leave their home museums again in my life time. Awesome!
One of the exhibitions there at the moment is Creation Story: Gee’s Bend Quilts and the Art of Thornton Dial.
I didn't know anything about Gee's Bend or the quilters until this exhibition. I am very happy to have had the chance to see it and learn from it. The quilts have great stories behind them and really lend themselves to lessons about shape, color, and symmetry/asymmetry.
The campers got a chance to spend some time in the gallery looking and making observations about the quilts. When we got back to the studio, we reviewed what we saw and I introduced the vocabulary symmetry and asymmetry. I instructed them that they were going to get a white card stock square and using different shapes of colored paper they would get to make their own paper quilt. In the center of the table they had a large amount of scrap paper to choose from. Painted papers, solid paper, and printed papers. I told them that they could use any colors and shapes they wanted, and they could make their quilt symmetrical or asymmetrical. I demonstrated the idea for them. My example is pictured below.

From there I let them go to create. They really took their time and thought about shapes, colors, and prints to use. I really loved how they came out. Below are a few student examples.


Here is a link to an older article for a different Gee's Bend exhibition, but it still has some interesting information.http://www.npr.org/templates/story/story.php?storyId=970364
Saturday, July 7, 2012
Torn Owls
My county starts back to school on August 1 and I thought that was just too long to wait for another post. I decided that I would post about a project that I did with my kindergarden class from my previous school. Torn Paper Owls
I got the idea from Deep Space Sparkle. It was originally designed for second grade, but I wanted to work on tearing and gluing with my littlest ones. Here is an example from the site:

We talked about where the horned owls live, what they eat, and how they are nocturnal. I then showed the class how to draw their owl and not to forget the feathers that look like horns. They glued down the eyes and beak first. I made sure to tell them this was the only time they were going to get to use scissors. Next I showed them how to tear their paper and fill in their owls. I asked them to remind me how much glue I was supposed to use. One Small Dot! After the owl was complete they added details with oil pastels (moon, stars, branch, etc.). This project took about three class periods but I think the art came out nicely. Here are a few student examples.


I got the idea from Deep Space Sparkle. It was originally designed for second grade, but I wanted to work on tearing and gluing with my littlest ones. Here is an example from the site:


This coming week I will be teaching an art camp at The Frist Center For the Visual Arts and I am very excited to see how the young artist art is going to turn out. I will definitely post about my teaching and share some student art! If you like what you see and want to see more, subscribe and follow! :)
Subscribe to:
Posts (Atom)