Monday, July 23, 2012

Art Camp: Eric Carle Collage

I feel that there is a special place in every elementary teacher's heart for author/illustrator Eric Carle. I love to do this project with my second graders. I start by introducing and talking about who Eric Carle is and what he does. Most students know of him and immediately get excited about our project. I show them a slide show on how Eric Carle makes his painted papers from his website. I also show them from the site, how he cut shapes from the paper and assembles them to make a picture. From here we spend the rest of the class just painting paper. I tell them not to paint a picture, but to paint like Eric Carle.


They paint until the end of class. Some students get one or two papers painted while some get six to eight done. Some try to have a contest to see who can get the most done. I actually encourage this because it doesn't give the student too much time to over think what they're going to paint. They just go for it, pure enthusiasm, and no inhibitions. For the next class, I take the papers and cut them down into smaller easier to handle pieces. There is nothing like trying to cut a small shape from a huge piece of paper. 

We start the next class with the story The Artist Who Painted a Blue Horse. I chose this story because I feel it breaks down the preconceived notions that art has to look realistic. If you have not checked this book out you need to. I review how Carle made his animal pictures and demonstrate how to make an animal from shapes. From here they get to choose a piece of colored construction paper for  their background and get to make a picture of any animal they want. 


I tell them that every element of their picture will be made from cut paper, no pencils! There also has to be a setting. No animals "floating in space."


I know you're traditionally supposed to save the best for last, but this is MY FAVORITE of all the collages I've ever seen. First, being a Sagittarius, centaurs hold a special place in my heart. Secondly, how creative. What seven year old thinks, "I'm going to make a picture of a centaur". This kid. 


A cute bird, and a lovely background.


I guess the owl craze has gotten to this kid as well. I think this owl is one of the most awesome owls I've ever seen.


This picture was created by an eight year old. It's a snake in a basket with a light shining on him, while his owner looks at him through the terrarium glass. Besides the overall greatness of this picture, one thing that's pretty cool is that the student cut triangles to put on the snake. It's easy to think that they may be part of the painted paper design, especially in a reproduction, but no.

I was blown away with the collages the campers made!

Tuesday, July 17, 2012

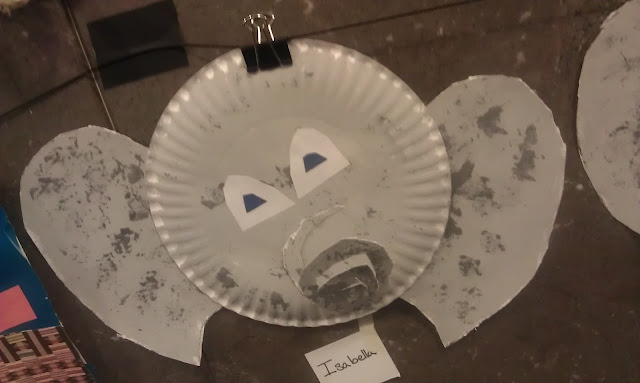
Art Camp: Textured Elephant Faces

In addition to the quilts from Gee's bend, there is a Bill Traylor exhibition at The Frist. Bill Traylor was a self taught artist who mainly drew from life. Below is one of his drawings that is exhibited at The Frist right now.


When I saw this picture I knew I had to do one of my favorite elephant projects.


This is a lesson I do with my kindergartners. The lesson works on tracing, cutting, shapes, painting in the lines, texture, new painting techniques, and symmetrical shapes. It's a lot, I know, but the lesson has worked so well.

First we talk about texture. We define it and find examples. I ask my students what the texture of an elephant  is. Common responses are dry, rough, and wrinkly. I inform them that we're making an elephant face from a paper plate, paint, and different shapes. I pass out large white paper, a template for ears, and a circle for the nose. I love their faces when I tell them that the trunk will be made from the circle. You can see them trying to process and figure out how. They trace the ears and circle in black crayon and paint all of the pieces a light gray including the plate. 

Next, each student gets a pre-cut square of plastic grocery bag. I show them how to "crumple" the plastic, paint dark gray onto it, and add texture to the elephant. Again, all shapes get textured paint. I really like that I'm able to find a reason to reuse the plastic bags.

The next time we meet, they cut out all of their shapes and attach the ears to the back of the plate. I've learned to use glue and masking tape. I've found that glue and tempera don't always seem to work together that well, so the tape adds extra reinforcement. I show them how to cut their circle into a spiral and attach it for the trunk. They love this part and think it's so cool. What's great is that I will see spirals turning up in other art projects without prompt. 

Lastly I teach them how they can get the exact same shape from one piece of paper if they fold and then cut out their shape. They do this step for their eyes. What's great about this step is later on I'll see them realize that they can fold the paper more than one time and get more than two shapes. I love seeing the students problem solve!!

Here are some student examples.


I really like the shape of the eyes on the last one!

Saturday, July 14, 2012

Happy Birthday Gustav Klimt!


One of my favorite artist's 150 birthday would be today! Gustav Klimt!  This day is getting me excited about my fourth grade tree of life lesson. The students' work comes out so nice and I love the aesthetics and criticism conversation we have about Klimt's art. School starts soon!

Friday, July 13, 2012

Art Camp: Gees Bend Inspired Paper Quilts

Tomorrow is the last day of camp at The Frist and I wanted to post some projects we've made over the next few days. The camp that I taught was Art Smarts for ages 5-7. It was a week long half day camp where we explored different art making methods each day: form/sculpture, painting, collage/assemblage, drawing, and printing. In addition, most of the projects are related to the current exhibitions.

Side note: One of my favorite things about The Frist is that they are a visiting gallery. The museum does not have a permanent collection and the exhibitions change about every three months. I love this. There will always be something different and there have been once in a lifetime exhibitions. Exhibitions that have come from other countries that may never leave their home museums again in my life time. Awesome!

One of the exhibitions there at the moment is Creation Story: Gee’s Bend Quilts and the Art of Thornton Dial.


I didn't know anything about Gee's Bend or the quilters until this exhibition. I am very happy to have had the chance to see it and learn from it. The quilts have great stories behind them and really lend themselves to lessons about shape, color, and symmetry/asymmetry. 

The campers got a chance to spend some time in the gallery looking and making observations about the quilts. When we got back to the studio, we reviewed what we saw and I introduced the vocabulary symmetry and asymmetry. I instructed them that they were going to get a white card stock square and using different shapes of colored paper they would get to make their own paper quilt. In the center of the table they had a large amount of scrap paper to choose from. Painted papers, solid paper, and printed papers. I told them that they could use any colors and shapes they wanted, and they could make their quilt symmetrical or asymmetrical. I demonstrated the idea for them. My example is pictured below.


From there I let them go to create. They really took their time and thought about shapes, colors, and prints to use. I really loved how they came out. Below are a few student examples.


Here is a link to an older article for a different Gee's Bend exhibition, but it still has some interesting information.http://www.npr.org/templates/story/story.php?storyId=970364

Wednesday, July 11, 2012

"Why Didn't I Think of That?!"

Have you ever seen a project, craft, or work of art and said "That is so awesome! Why didn't I think of that?!" I personally have had this moment a lot. I usually have this moment when I'm on my favorite "visual bookmark" website Pinterest. Not too long ago I saw this creative idea.


I knew that I had to have these on my Exploring Table. I know many teachers anticipate the words made famous by elementary artist, "I'm done." Most of the time, when I hear these words, the student isn't actually done. They have missed a step, could do a step with better craftsmanship, have a random floating object in space, the sky isn't touching the ground, etc. I address the issues, offer suggestions and corrections. In some cases though the student is really done with the project and there are several minutes left in the period. This is when I direct the students to my Exploring Table. I have different puzzles, tangrams, how to draw books, and a small but growing library. I have already started making the Velcro sticks and I hope that my students will enjoy them.
I made my sticks a little differently than the ones pictured above. The quantity pictured appear to be made for one child. I wanted to make enough for two to three students to work with them at a time. I have forty sticks. That means I would need 160 Velcro dots. The dots came in packages of twelve at $3.99 a pop. After dividing and multiplying, the answer to my math problem was = I'm not paying that much for Velcro. What I did instead was buy 5' a roll of sticky sided velcro for $7, cut individual squares and put four onto a stick.


For me it's a matter of more time than money. I'm not done yet and have about 30 more sticks to go, but I really think my students are going to enjoy them. Here's what mine look like.


Do you have extra activities for students that get done early? Share in the comments. That way others can read about them and have a "Why didn't I think of that" moment.


Saturday, July 7, 2012

Torn Owls

My county starts back to school on August 1 and I thought that was just too long to wait for another post. I decided that I would post about a project that I did with my kindergarden class from my previous school. Torn Paper Owls
I got the idea from Deep Space Sparkle. It was originally designed for second grade, but I wanted to work on tearing and gluing with my littlest ones. Here is an example from the site:


We talked about where the horned owls live, what they eat, and how they are nocturnal. I then showed the class how to draw their owl and not to forget the feathers that look like horns. They glued down the eyes and beak first. I made sure to tell them this was the only time they were going to get to use scissors. Next I showed them how to tear their paper and fill in their owls. I asked them to remind me how much glue I was supposed to use. One Small Dot! After the owl was complete they added details with oil pastels (moon, stars, branch, etc.). This project took about three class periods but I think the art came out nicely. Here are a few student examples.


This coming week I will be teaching an art camp at The Frist Center For the Visual Arts and I am very excited to see how the young artist art is going to turn out. I will definitely post about my teaching and share some student art! If you like what you see and want to see more, subscribe and follow! :)

Tuesday, July 3, 2012

I am starting many new adventures this year. I am the new art teacher at my school, I am starting an art ed blog, I recently got married, and I'll be moving soon. My plate is full but I'm ready to embrace my new adventures.
Today I was able to stop in and check out my new room (well, new to me at least).  This will be my second year teaching and there will be several things different about this year. At my last school I was one of two art teachers, came in mid year, and was in a community room. I had people coming in and out at all times mainly because I had one of the three adult bathrooms in the entire building in my room. Perk is that I was never lonely. This year I am coming in behind a teacher who retired last year, I have a room to my self, and I'm the only art teacher for the school.

Pros- Coming in behind an established teacher means that there are a lot of resources available. There are materials that have been collected over the years, two bookshelves full of books, and many art reproductions. I also have more wall space than I ever thought I would have, something I didn't have very much of last year.

Cons- I liked having another art teacher in the building to bounce ideas off of. She also became my friend and we could dentify with each other when it came to teaching. She also had 8 years teaching experience on me and was able to give advice about previous and new art lessons. Even though I will miss not being able to walk down the hall and chat, I know that with the plethora of technology we will stay in touch.

Here are before pictures of my "new" room.


I will post after pictures once I have it all set up and decorated. Like any artist, I can't wait to see the finished product.